Inspiration Gallery
View beautiful outdoor spaces created with Navascape products
Technical Information
Product specifications, engineering drawings and more
Installation Guidelines - Pavers / Home
Installation Guidelines - Pavers
These installation guidelines apply to architectural tiles, interlocking paving stones and paver slabs. If your project includes paving and walls, install the walls first.
To download typical design cross-sections, please click here.
 Determine the depth of the excavation by adding together the recommended depth of the base material and setting bed and the thickness of the product you have chosen. For paving stone installations and vehicular applications, the surface of the installed product should be 5 mm (0.25") above grade. During compaction, the product will settle into the setting bed, creating a strong interlock.
Be sure that your plan includes grading the area for proper drainage. A minimum grade of 1 cm per meter (1/8" per foot) is required to carry water away from house foundations and to prevent water from standing on the surface.
After excavation, spread the base material uniformly throughout the excavated area with a hard toothed rake in layers of no more than 100 mm (4”). Use a tamper to compact the entire area evenly. Continue spreading and compacting base material until the desired depth is achieved and the surface has no high or low areas. Level the base to the desired grades, remembering to grade it so water is directed away from structures.
 A simple and accurate way to establish final grading and a good setting bed is to use a process known as screeding. Obtain screeding rails of approximately 25 mm (1") diameter or thickness (pipe is ideal). Set the screeding rails on the compacted base and use a transit or 4’ hand level to check that the grades are accurate. Allow for a 20-25% rate of compaction for the uncompacted setting bed when setting rails. Carefully shovel the bedding sand around and between the rails. Run a screeding board, such as a straight 2x4 timber along the top of the rails to level the sand evenly. Reset the rails as needed to screed the entire project. Screed only the area you are able to cover with product on that same day.
 Edge restraint prevents paving installations from shifting and spreading and is recommended on all edges of any installation not abutting a structure such as a building or a wall. The edge restraint must be installed on the compacted granular base material (not the setting bed). Although it can be installed after the product is laid, it is often placed first to serve as a starting edge.
 Begin placing the tiles/pavers on the setting bed in the desired pattern, starting at an edge or a 90 degree corner. This will provide a straight line and reduce the need for cutting. Snap a chalk line or set a string line to follow when laying to ensure lines remain straight. Do not walk or kneel on the edges of tiles or near the edges of the paving stone installation, as this may cause them to tilt or sink unevenly.
Some Navascape products are manufactured with spacer bars on the side to ensure accurate spacing of the joints. If the style you are using does not have spacer bars, leave a 1.5-3 mm (1/16 – 1/8”) space around the product to act as a joint. In non-vehicular applications, architectural tiles and paver slabs can be laid without joints.
To ensure good color distribution, take pieces from several bundles at a time. Remove paving stones in stacks rather than layers. Frequently look at the overall area and ensure good color distribution is being achieved throughout the project.
Cut the units as needed to finish edges. Do not install a cut piece that is less than 1/3 of its original size as pieces this small are likely to break. Instead, cut two larger pieces.
Walk around the project to ensure good color distribution and that none of the units rock back and forth or are significantly lower than the others. Units are easily removed and replaced prior to compacting.
 All interlocking paver installations must be compacted to ensure a strong interlock. Sweep the surface to remove any debris that could mar the surface of the product. Next, run the vibrating compactor up and down, then side to side over the entire installation. Any small irregularities in paver height caused during the laying process will be leveled out during compaction.
Compact the pavers at the end of each workday to within 1 m (3') of all unrestrained edges. The compactor should pass over all pavers a minimum of 2 times.
Paver slab installations and most architectural tile installations should not be compacted. However, architectural tiles used in a vehicular application [60 mm (2.36”) modules only] must be compacted as above. In order to avoid marring the surface of the StoneTile modules during compaction, we recommend laying Mirafi 140 non-woven geotextile (available from your local landscape supply store) over the tiles prior to compaction.
Once all of the product has been installed and compacted (where necessary), sweep the jointing material back and forth over the surface until all the joints are full. In order to keep weeds or grass from growing in the joints, maintain your installation by keeping them filled with sand. Sweeping joint sand into the joints on a yearly basis will reduce the possibility of weed growth. Or, for a lower maintenance option, choose a more durable polymeric sand.
To download typical design cross-sections, please click here.
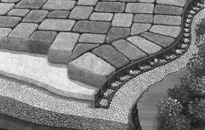
Excavation & Base Preparation
Determine the depth of the excavation by adding together the recommended depth of the base material and setting bed and the thickness of the product you have chosen. For paving stone installations and vehicular applications, the surface of the installed product should be 5 mm (0.25") above grade. During compaction, the product will settle into the setting bed, creating a strong interlock. Be sure that your plan includes grading the area for proper drainage. A minimum grade of 1 cm per meter (1/8" per foot) is required to carry water away from house foundations and to prevent water from standing on the surface.
After excavation, spread the base material uniformly throughout the excavated area with a hard toothed rake in layers of no more than 100 mm (4”). Use a tamper to compact the entire area evenly. Continue spreading and compacting base material until the desired depth is achieved and the surface has no high or low areas. Level the base to the desired grades, remembering to grade it so water is directed away from structures.
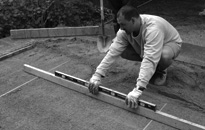
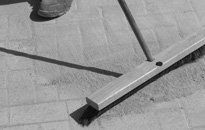
Constructing the Setting Bed
A simple and accurate way to establish final grading and a good setting bed is to use a process known as screeding. Obtain screeding rails of approximately 25 mm (1") diameter or thickness (pipe is ideal). Set the screeding rails on the compacted base and use a transit or 4’ hand level to check that the grades are accurate. Allow for a 20-25% rate of compaction for the uncompacted setting bed when setting rails. Carefully shovel the bedding sand around and between the rails. Run a screeding board, such as a straight 2x4 timber along the top of the rails to level the sand evenly. Reset the rails as needed to screed the entire project. Screed only the area you are able to cover with product on that same day.Installing the Edge Restraint
Edge restraint prevents paving installations from shifting and spreading and is recommended on all edges of any installation not abutting a structure such as a building or a wall. The edge restraint must be installed on the compacted granular base material (not the setting bed). Although it can be installed after the product is laid, it is often placed first to serve as a starting edge.Laying the Product
Begin placing the tiles/pavers on the setting bed in the desired pattern, starting at an edge or a 90 degree corner. This will provide a straight line and reduce the need for cutting. Snap a chalk line or set a string line to follow when laying to ensure lines remain straight. Do not walk or kneel on the edges of tiles or near the edges of the paving stone installation, as this may cause them to tilt or sink unevenly. Some Navascape products are manufactured with spacer bars on the side to ensure accurate spacing of the joints. If the style you are using does not have spacer bars, leave a 1.5-3 mm (1/16 – 1/8”) space around the product to act as a joint. In non-vehicular applications, architectural tiles and paver slabs can be laid without joints.
To ensure good color distribution, take pieces from several bundles at a time. Remove paving stones in stacks rather than layers. Frequently look at the overall area and ensure good color distribution is being achieved throughout the project.
Cut the units as needed to finish edges. Do not install a cut piece that is less than 1/3 of its original size as pieces this small are likely to break. Instead, cut two larger pieces.
Walk around the project to ensure good color distribution and that none of the units rock back and forth or are significantly lower than the others. Units are easily removed and replaced prior to compacting.
Tamping, Sanding & Maintenance
All interlocking paver installations must be compacted to ensure a strong interlock. Sweep the surface to remove any debris that could mar the surface of the product. Next, run the vibrating compactor up and down, then side to side over the entire installation. Any small irregularities in paver height caused during the laying process will be leveled out during compaction. Compact the pavers at the end of each workday to within 1 m (3') of all unrestrained edges. The compactor should pass over all pavers a minimum of 2 times.
Paver slab installations and most architectural tile installations should not be compacted. However, architectural tiles used in a vehicular application [60 mm (2.36”) modules only] must be compacted as above. In order to avoid marring the surface of the StoneTile modules during compaction, we recommend laying Mirafi 140 non-woven geotextile (available from your local landscape supply store) over the tiles prior to compaction.
Once all of the product has been installed and compacted (where necessary), sweep the jointing material back and forth over the surface until all the joints are full. In order to keep weeds or grass from growing in the joints, maintain your installation by keeping them filled with sand. Sweeping joint sand into the joints on a yearly basis will reduce the possibility of weed growth. Or, for a lower maintenance option, choose a more durable polymeric sand.